About Me

My photo
My tremendously supportive husband & I have 3 wonderful children, 1 dog, 12 laying hens, 2 dairy goats, 3 bee hives, and a 2000 sq foot vegetable garden on a small 1/4 acre lot in the city. In the center of it all is our small 1,000 sq foot house purchased in 2008 as a foreclosure that we fully renovated to host our growing family, home school adventures, and small home business (CozyLeaf.com). We have a desire to learn a path to self sufficiency finding ways to be good stewards of the resources God has given us. We want to learn to live with less as we laydown roots to our little homestead.

Friday, July 8, 2011

Welcome to the back 40...feet

Welcome to "the back 40" (as we call it)...I wish it were the back 40 acres, but its just the back 40 feet! Bryan built a cute picket fence and walkway in front of the garden to help section off the garden and bees from the rest of the yard. 


We have planted 1 bed of beans that is doing fabulous and are getting ready to plant several more beds of beans as a fall crop. I love the various beans we have coming up. We planted a variety of colors so when the kids go exploring for beans they get to find yellow, purple and striped beans instead of just regular green beans...although they are tremendously fun to find as well!


Once the busy time of goat milking is done in the morning our backyard quickly becomes a very peaceful place to relax! The bee hives are tucked into the corner of the garden bringing thousands of pollinators quickly into our garden as well as a growth of fresh honey :) You can sit back and hear the peaceful hummmm of the workers comes from their hives. Then glance to the other side of the yard and see Peaches and Poppy relaxing  after their morning milking. They love spending the cool breezy morning relaxing beside their bin of alfalfa while the chickens peck around the yard finding little "protein treats" (bugs)! Its quite a peaceful time of day! I fully enjoy the relaxation of watching my "backyard work for me". The garden is growing, the bees are buzzing around pollinating and storing up honey, the goats are "replenishing their milk supply", the chickens are laying eggs and being a fabulous bug pest control, and the chickens and goats are turning the compost pile as well as "producing compost" to enrich the soil! 

 It has been a tremendous amount of work to get our backyard to this level of productivity...but we have no intention of stopping here!! We are continually trying to find new ideas to put our little plot of land to work!

The front 3 beds are now empty after harvesting the leafy greens (arugula, lettuce, and spinach) and peas. We prepped those beds to plant more bush beans and here soon we will plant our fall crop of beans in those beds. 
Then we have 1 row of tomatoes, 1 bed  of beans, and 2 beds of tomatoes. 
Last year we planted a very wide variety of vegetables, all for the purpose of finding out what we like to grow and like to eat. Then after realizing there are some things we are terrible at growing we decided to limit our variety and use the "barter system". We can grow beans and tomatoes well and it is easy to trade those veggies with people who grow other vegetables well. Then of course we had to plant a few herbs for fresh garden herbs. We also have 1 row of quite a few different varieties of peppers and I am anxious to experiment with new recipes!

Taste the Rainbow!! Our tomatoes are taking off!! We planted a variety of colors and sizes and have already harvested a dozen pounds of tomatoes...that doesn't even count what Addie and Henry have eaten while standing out in the garden "harvesting".

We have 2 beds of tomatoes...its our "wall of tomatoes". I can not wait for these fresh balls of delightful flavor to flow out of the garden!! I have alot of canning I want to do as well as sun drying! We sundried several dozen pounds of tomatoes last year (which only ends up being a few pounds of dried tomatoes) and they were extremely fun to savor during the winter months! Sundried tomatoes are fabulous to toss into a winter pasta or salad...I plan to make much more this year!! 
 

I used t-posts and cotton string to make my wall of tomatoes and so far it has done quite well. Now that the tomatoes are growing and branching out I can see that the weight of the tomatoes might be a little heavy for the thin cotton string I selected. I tied up some extra rounds of string to make sure the wall wont collapse under the weight and pressure from the plants. Last year I used some vinyl twine that held up really well but I Wanted to go with a string that would be compostable and I sure hope the walls don't collapse with the stretching of this cotton string! This method easily contains the tomatoes and helps these 8 foot tall plants have somewhere to go as they grow taller and taller. Last year we had tomato plants well over 10 foot tall by the end of the season. 

I hope everyone's gardening adventures are going well!! I would love to hear about your garden, animals and harvest! 

Monday, July 4, 2011

First Taste of our Capped Honey

While Bryan was inspecting his bee hives, he pulled out a few honey bars and let us all have a taste. Freshly capped nectar does not taste like honey that you will find in the store. It has the same texture as the honey we all know, it slightly tart but very fresh and smooth. The bees cap the cell and over time it will become sweet honey. Putting the tip of your finger into the capped cells will bring out this delightful little treat!
Extremely fresh and local honey! 


Preparing Top Bars for Bee hive

First you need to collect all your boards. They can be anywhere from 1 3/8" to 1 3/4" depending on the bees. We purchased 8 foot 1x2 boards to cut down (which are 1 1/2"). Cut the boards to the top size of your bee box. 

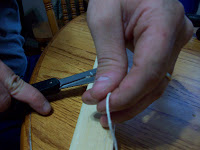
Pull your cotton string tight across the center of your board and clamp each end so the string stays in place while you apply the wax line. 


 At this point you are ready to melt the wax onto your cotton string line. We have tried several methods to get a good even wax line and the best and quickest method is to use a blow torch on low. 


Clip off the end of the string, toss the board into the pile, and start the next one!

The top bars will all lay side by side on top of your bee box (wax side down).
Within a matter of days your bees will start building their own comb and storing up honey! 


Sunday, July 3, 2011

Easy Pasta

Pasta with crumbly herb goat cheese and red zebra tomatoes! This is by far one of my favourite meals to make and to eat. It is extremely easy and explosive in flavor and freshness.
Published with Blogger-droid v1.7.2

Saturday, July 2, 2011

Kenyan Top Bar Hives... Why we chose this style of hive

Kenyan Top Bar Bee Hive
As we started researching the top bar hive and the long term benefits, we realized that the long term benefits of the top bar hive was congruent with our view of backyard farming.
  • Inexpensive: The number one motivation was cost! You can build these completely out of scrap wood. They are designed and developed for third world countries where materials are scarce. You could easily drop close to $1,000 in equipment alone for a Langstroth or Warre type hive. So the Kenyan Top Bar appealed to us in that way. All of the materials to build these 3 hives cost us a mere $20...and we have plenty of spare wood to build more as well!! 
  • Little Treatment: You have a reduced dependence on chemicals to treat various mites and hive beetles. 
  • Health: The bees build their own comb and cells which allows them to be healthier and resist mites. The bees know better than we do and they sure do know how to build their own comb...so why not let them! 
  • Versatility in Design & Size: There is not one set design so you can design and be creative with the construction. There are hundreds of designs out there for how each person prefers their top bar hive to look. Bryan designed and built our hives out of scrap wood which he bought at an estate sale. For $20 he purchased enough old scrap wood to make at least 10 hives (which we don't need 10 hives, but for $20 he decided to buy all the wood!). You can truly personalize these boxes! Bryan designed all of our hives to the same interior dimensions so that comb is transferable in case you want to split a colony. 


There are many benefits and desirable features to the Kenyan Top Bar hive and this is just the surface! Join us on our journey as we discover and research more about this method of bee keeping. 


Friday, July 1, 2011

Hot Hens!! Temperatures are rising Keep those animals cooled off in the summer heat!

Record high temperatures are not a good thing for you backyard herd! Your chickens will be particularly affected by the heat. Be prepared with a few tricks to beat the heat and keep your hens laying you beautiful homegrown eggs. You definitely do not have to do ALL these thing to ensure you do not loose your whole flock, but rotate it up and see what you and your animals prefer.

  • Fresh Water!!! First and foremost is WATER!! You will be surprised how much water your animals will consume on those hot days! Keep their water fresh and cool. I even toss in ice cubes and it will have my animals complete attention! Curiosity will bring them to the water bucket and everyone will get a fresh cool drink! Freeze ice blocks to help keep the water cooler longer. 
  • Chilled fruit and veggies! Cut up veggies and fruit, toss them in the freezer and have a lovely afternoon treat for your animals. Focus on fruit and veggies that are high in water content. My girls love frozen or chilled tomatoes and watermelon. On the crazy hot summer days I collect any damaged or dropped tomatoes from the garden first thing in the morning and instead of tossing them to the compost pile, I take them inside to chill for a few hours. 
  • Water frozen in pop bottles and milk jugs. Lay the bottles outside in your animals favorite afternoon shade tree spot and you will find their popular location will become even more popular as the bottles will help cool the area! Clean off your bottles at night and refreeze them...keep a good rotation of clean bottles! 
  • Shade! Make sure they have plenty of shade access!! If you are concerned about them having enough shade, try covering an area with a tarp to provide more shade...just don't make it a blanket that cuts off their air circulation!
  • Misters. We do not have misters for our girls (yet) but this is one way to cool the air by several degrees. Our hens do not run for cover when it rains so I think they would enjoy the misters. We want to set up some misters on a timer so we don't end up with a mud pit. Also we need to rotate the mist so our goats can still enjoy the yard...goats hate rain and hate being sprayed with water!! 
  • Fans. Place a fan right outside their fence and help get air circulation!
  • Ice packs! Those little nest boxes can get extremely hot...especially if your coop is in the sun part of the day. Chickens LOVE to dust bath and this will help cool them as well. If your flock are big fans of this, try tucking a few ice packs in the sand where they dust bath...just keep an eye on them and make sure they don't try to peck away and tear open the ice packs. Clean off your ice packs at night and refreeze them...keep a good rotation of clean packs! 
  • Flat bucket of water for them to walk through to cool their feet and legs...some chickens may walk, some may lay down, and other might just think its for drinking. 
These are just a few ideas of what you can try. Let me know what works for you and your animals!