About Me

My photo
My tremendously supportive husband & I have 3 wonderful children, 1 dog, 12 laying hens, 2 dairy goats, 3 bee hives, and a 2000 sq foot vegetable garden on a small 1/4 acre lot in the city. In the center of it all is our small 1,000 sq foot house purchased in 2008 as a foreclosure that we fully renovated to host our growing family, home school adventures, and small home business (CozyLeaf.com). We have a desire to learn a path to self sufficiency finding ways to be good stewards of the resources God has given us. We want to learn to live with less as we laydown roots to our little homestead.
Showing posts with label homeschool. Show all posts

Monday, May 13, 2013

Incubating duck eggs 28 days, then little ducklings hatch

I absolutely adore this time of year! Our little homestead is full of life!! Baby goats, baby chicks and now baby ducks! We started incubating 28 duck eggs a month ago and we get to enjoy these little feathery friends in our backyard!
Here is a video of our incubation process.


Tuesday, March 12, 2013

"Quack Quack" for Appleyard Ducks!!!

I could not be more excited!!! I have been wanting ducks for years!! These fine feathered friends joined our backyard homestead this week and are already bringing beautiful duck eggs into my kitchen :) I have been searching for good pure bred backyard duck and have settled on the Appleyards. They are a fabulous multipurpose breed (eggs and meat) and absolutely beautiful. We purchased these 4 hens and 1 drake from a local farmer who was selling off her flock. Yes, we have a drake....so hopefully we will be hatching some little ducklings in our incubator soon!!!!!

Meet the little crew!!!


Saturday, October 6, 2012

1 week old baby chicks

These little baby chicks are so cute and fluffy!! They are 1 week old Cornish Cross meat birds. They grow quite fast and eat alot!!


Look at the legs on this fella!!


 They are very curious and love to see what I am doing...cause of course they assume I am  bringing them food! 
Dance time!!


Saturday, September 29, 2012

Baby Chicks are here!!!


They arrived safely in a ventilated box picked up at the farmers market.

We transferred them over to their cage where they can huddle up under the heat light and keep each other warm

They quickly found the feed and water and dove right in!

Thursday, September 27, 2012

Baby Chick Feeder DIY Super Easy Works Great!

We have more baby chicks here on our little farm and they sure do eat alot! Its quite frustrating to constantly be filling their food and then realize its all out again! I love these little feeders that hook to a mason jar but I do not like that you can only fill them with 1 quart of feed at a time. They take up minimal floor space on the cage but are quite a hassle if you have a lot of birds. I kept trying to think of a way to make them easier to fill (from the outside of the cage) as well as easier to keep full! I took our metal feed tray with me to Lowes and found all the lovely parts to make it work like it does in my mind!!

Supplies: 1 feeder tray (I used the metal tray so I could bend out the inside rings so the PVC would slide right in $3.50),  1 4"x2" PVC Coupling (In the plumbing section of your hardware store - $5), 1 4" PCV Pipe (I got the 5' piece and cut it in half so I can make 2 of these feeders - $8), 1 tube of All Purpose Caulking ($2.99)
Total Cost: Under $20! I also have half of the PVC pipe left to make another feeder as well as plenty of caulking for other projects! Or you could make 2 of these (by purchasing an additional feeder tray($3.50 and an additional PVC Coupling $5) for $29.

 Start by crimping, hammering, or pinching your ring so its completely flat (this looks like its got extra crimps, but they are pushed to the opposite side so as to flatten the inside)

Now its time for the caulking. Apply it generously so you get a good firm seal

 Wipe clean any goopy extra that has smashed out. 


 Now cut your PVC pipe if you want. I wanted to cut mine so I could make 2 and I wanted them short so my kids can easily fill them. If they were 5 feet tall, they would hold alot more feed, but the kids wouldnt be able to do all the upkeep. So decide what your needs are and modify as needed!

 Get your drill bit ready and make your wholes to connect your feeder with zip ties. 
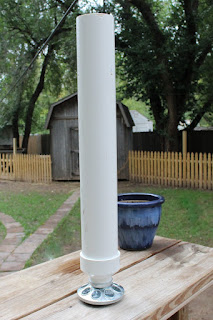

Ready for Install!!


Hook up your feeder wherever is most convenient for you to monitor and fill it...also consider what will be easiest and most efficient for the chicks to gather around and eat from it! Dont put it in a corner or the backside of the feeder will be cut off.


 Zip tie the top and bottom in place so the birds dont move it around.

They LOVE it!! They are super curious and it doesnt even have any feed poured in it yet!

Pour away!! Its perfect height for my kids to reach it and peek in to see how full it is. I used an old pot as the cap to keep out bugs. You can purchase a PVC cap, but im sure you have a tupperware or old pot you can use...save the money for feed!
 
 All gathered around and eatin away! I have our feeder right in the middle of the chicks cage. I also have the whole cage up off the ground an inch or so to help keep them nice and clean. I use cheap plastic table clothes (2 for $1) to cover the floor, makes for SUPER easy clean up! I clean it as needed. I can also lift this cage quite easily and set them outside on the ground to get some good outdoors time. This makes for super easy cleanup, just by moving them! They will only be in this cage for a few weeks. In which we will increase their outdoors time till they are ready to scratch, run, play, and defend themselves outside.

Let me know if you use this idea!! I would love to hear how it works for you and what modifications you do to make it work best for your situation.

Thanks!

Saturday, September 8, 2012

Feeding Time

In the morning, everyone must eat! 

George loves to "help" feed the goats. I'm sure they are mostly just annoyed with him playing in every tiny bit of their food before they get to eat it. 

George is feeding a few extra handfuls to Poppy who is always eager for any "extras"!

Tuesday, January 24, 2012

Addie's Avocado Almond "dip it" recipe (grain free, dairy free)

What's more fun than decorating your dip!! This is Addie's new favorite "dip it" and it is actually a recipe that she made up! She just kept saying "ok mommy, lets put some of this in there"...and so I did and then we blended it up and decorated it!

  • 1/2 cup almonds (soaked overnight in water)
  • 1 avocado
  • 1/4 cup olive oil
  • 1 teaspoon lemon juice
  • 1/2 tomato (quickly eat the other half so it doesnt go bad - at least that is what Addie says!)
  • 1 garlic clove
  • salt to taste
Easy directions: Toss it all in a bowl and puree it with a hand blender. And of course you must make a fun face on your dip...this is Henry and Addies favorite part!


This dip is great with sliced bell peppers, carrots and celery! Addie also likes it on her lettuce wraps with a little bit of turkey! 

Enjoy!! Let me know what creative ways you find to use this dip!


Monday, December 12, 2011

Letters in Flour for Preschoolers

Fitting everything into one day can be quite a challenge sometimes! I love to have "formal school time" where we sit down at the table for a few hours and really focus on various assignments, but in all actuality that is not the way it happens every day! Since the kids are still in the pre-school age, I try to come up with fun activities to accomplish our work. This is by far one of Addies favorite ways to work on her letters and numbers! While Im doing some baking, I will just spread some flour on the counter and let Addie draw with her finger for an hour or so! She absolutely loves it and it is an easy way to get through some school work while baking bread or other goodies!!

Thursday, September 15, 2011

"I LOVE Metamorphosis!"

Every year my mom pulls a few caterpillars off her parsley plants and puts them in a jar for the kids. The kids loved it last year, but this year has been so much more exciting and educational. All week last week we watched the little cocoon clung to the side of the glass jar waiting in anticipation for "his" arrival. We talked about metamorphosis and all the bugs that go through metamorphosis. Bryan opened up his been hives and we were able to find all the stages of metamorphosis in the bees as well. 
The day finally arrived and we saw the butterfly in the jar! Henry had noticed the cocoon as he ran by to go outside to play and less than an hour later I heard screaming about the butterfly...we just missed seeing it emerge, but the excitement would have probably been too overwhelming for that poor butterfly! We watched it for about 15 minutes in the jar as it had a chance to fully expand its wings (they are curled up at first and take a little while to open all up). Then we opened the jar outside so "he could go find his family" (as Addie kept saying). The butterfly crawled out and hung around for about 15 minutes, crawling up and down Henry and Addie. They were overjoyed!! Henry kept yelling "I LOVE Metamorphosis!!" 


Wednesday, August 31, 2011

Root Beer Floats from homemade rootbeer


It hot outside!! We are about to break a record here for most 100 degree days in a summer and that has been disastrous for our backyard! But on a happier note...when its hot what is more fun than icecream...and even more fun than that is ROOTBEER FLOATS!!!  We have had a bottle of root beer extract for about a year and have yet to use it. So, in celebration of... well, everything ... we are making Rootbeer! And what is more fun than a "pre-dinner activity" with friends!

Bryan found this recipe on the Backwoods Home website (backwoodshome.com). We wanted to brew the rootbeer so we could bottle it...but this recipe with the dry ice just looked like WAY too much fun to pass up!

Super-kwik super-cooled root beer:
6 cups sugar
3¼ gallons cold water
2 ounces root beer extract
4 pounds dry ice


In a large cooler or tub, mix sugar and water together until sugar dissolves. Stir in the extract. Gently put dry ice into the liquid and cover with a lid, loosely. Don't tighten it down or pressure may build up. Let the mixture "brew" for about an hour, then serve. Store the remainder in gallon jugs or bottles.


So, here we go!!
First, I would like to add a note...read your recipe! I thought I had read the recipe very carefully and when it say "2 oz of extract" that does not necessarily mean it will be the entire bottle...I put in the entire bottle which was 4 oz (oops). So we had to make some quick adjustments of quantities! 
   
Now that we have our water, sugar and extract all stirred together...its time for the fun part!!! DRY ICE!!

Henry, the girls won this one!


This method of root beer does not produce a carbonated beverage...but it was very cold and delicious over ice cream! The dry ice was a delight for the kids to watch as it bubbled and produced the overly exciting fog! Definitely the recipe I recommend if you are making root beer for a group...not the recipe I would recommend if you are wanting to bottle it though.


All these wonderful pictures were taken by my dear friend Nicole! Check out more of her pictures on her blog!