 Last August we started our first batch of wine from grapes... Marechel Foch! We have bottled quite a bit of wine from concentrate, but this is our first experiment with grapes and it is finally bottled. We started with 3 - 5 gallon carboys of wine that we let set for a couple months and then racked the wine off the sediment and into 2 - 5 gallon carboys. We were quite nervous this past 6 months and wondered how it would turn out, but so far we are very pleased with the quality. Last weekend we racked the wine again to help get all the sediment out of the carboys and let it set. Then the next day we bottled 45 bottles! We followed the same bottling steps that we did for our Phase 2 of Pinot Noir. We will let this wine set for at least a month or two before cracking into them...which is perfect timing because I'm 33 weeks along in my pregnancy and have only 7 more weeks to go! This will be a fun celebratory wine for the arrival of our 3rd child!
 About Me

- Homestead Roots
- My tremendously supportive husband & I have 3 wonderful children, 1 dog, 12 laying hens, 2 dairy goats, 3 bee hives, and a 2000 sq foot vegetable garden on a small 1/4 acre lot in the city. In the center of it all is our small 1,000 sq foot house purchased in 2008 as a foreclosure that we fully renovated to host our growing family, home school adventures, and small home business (CozyLeaf.com). We have a desire to learn a path to self sufficiency finding ways to be good stewards of the resources God has given us. We want to learn to live with less as we laydown roots to our little homestead.
Showing posts with label wine. Show all posts
Showing posts with label wine. Show all posts
Tuesday, March 29, 2011
45 Bottles of Marechel Foch
Last August we started our first batch of wine from grapes... Marechel Foch! We have bottled quite a bit of wine from concentrate, but this is our first experiment with grapes and it is finally bottled. We started with 3 - 5 gallon carboys of wine that we let set for a couple months and then racked the wine off the sediment and into 2 - 5 gallon carboys. We were quite nervous this past 6 months and wondered how it would turn out, but so far we are very pleased with the quality. Last weekend we racked the wine again to help get all the sediment out of the carboys and let it set. Then the next day we bottled 45 bottles! We followed the same bottling steps that we did for our Phase 2 of Pinot Noir. We will let this wine set for at least a month or two before cracking into them...which is perfect timing because I'm 33 weeks along in my pregnancy and have only 7 more weeks to go! This will be a fun celebratory wine for the arrival of our 3rd child! Sunday, March 20, 2011
83 Bottles of Wine on the Counter

Removing labels can be extremely easy or so frustrating that you just want to break the bottle so you don't have to deal with it anymore! Most labels will peel right off with just hot water and a good scrapper (I've found that Pampered Chef stoneware cleaners work fabulously). However, there are other labels that have a nasty residue that make them nearly impossible to remove. That is when you want some good "super grunge remover"! It's a powder that you add to your hot water and it penetrates just about any label. Of 87 bottles, we only had 4 that we gave up on cleaning the labels...those 4 went to the recycling bucket never to be seen here again ;)
Now we have clean labeless bottles and a lot of wine to fill!
Published with Blogger-droid v1.6.7
Thursday, August 26, 2010
Marachel Foch Wine

 We used 10 gallons of the juice we crushed and extracted to begin our batch of wine.
 We made a simple syrup with about 8 cups of water and 8 and a half pounds of sugar that we added to the juice (looking back we wish we would have used juice to make the simple syrup instead of adding water, but we will make sure to do that next time). Then we filtered the juice through our "handy dandy filter system" (picture to the left) and divided it into 3 different carboys (to avoid overflow we did not fill them to the top...yet).
Marechal Foch Grapes into Juice for Wine, Juice and Jams
So the time has finally arrived and we have had the opportunity to get our hands on some wine grapes! With 240 lbs of grapes we have ended up with 10 gallons of wine, 14 quarts of canned grape juice, 8 pints of jam and 9 half pints of jam. This was quite a bit of work and even more mess, but so much fun!!


 This crusher is intended for a 55 gallon barrel, but all we had was a 6 gallon primary fermentor so we set the crusher on top of that. I highly recommend using one of these if you have the opportunity, it was very easy and very fast. We did all our grapes in less than 30 minutes.
 They enter the crusher and one person holds on to the crusher and the other cranks the handle.
  All crushed!
 Grapes in the primary fermenters to set for 1 day and extract the juices!
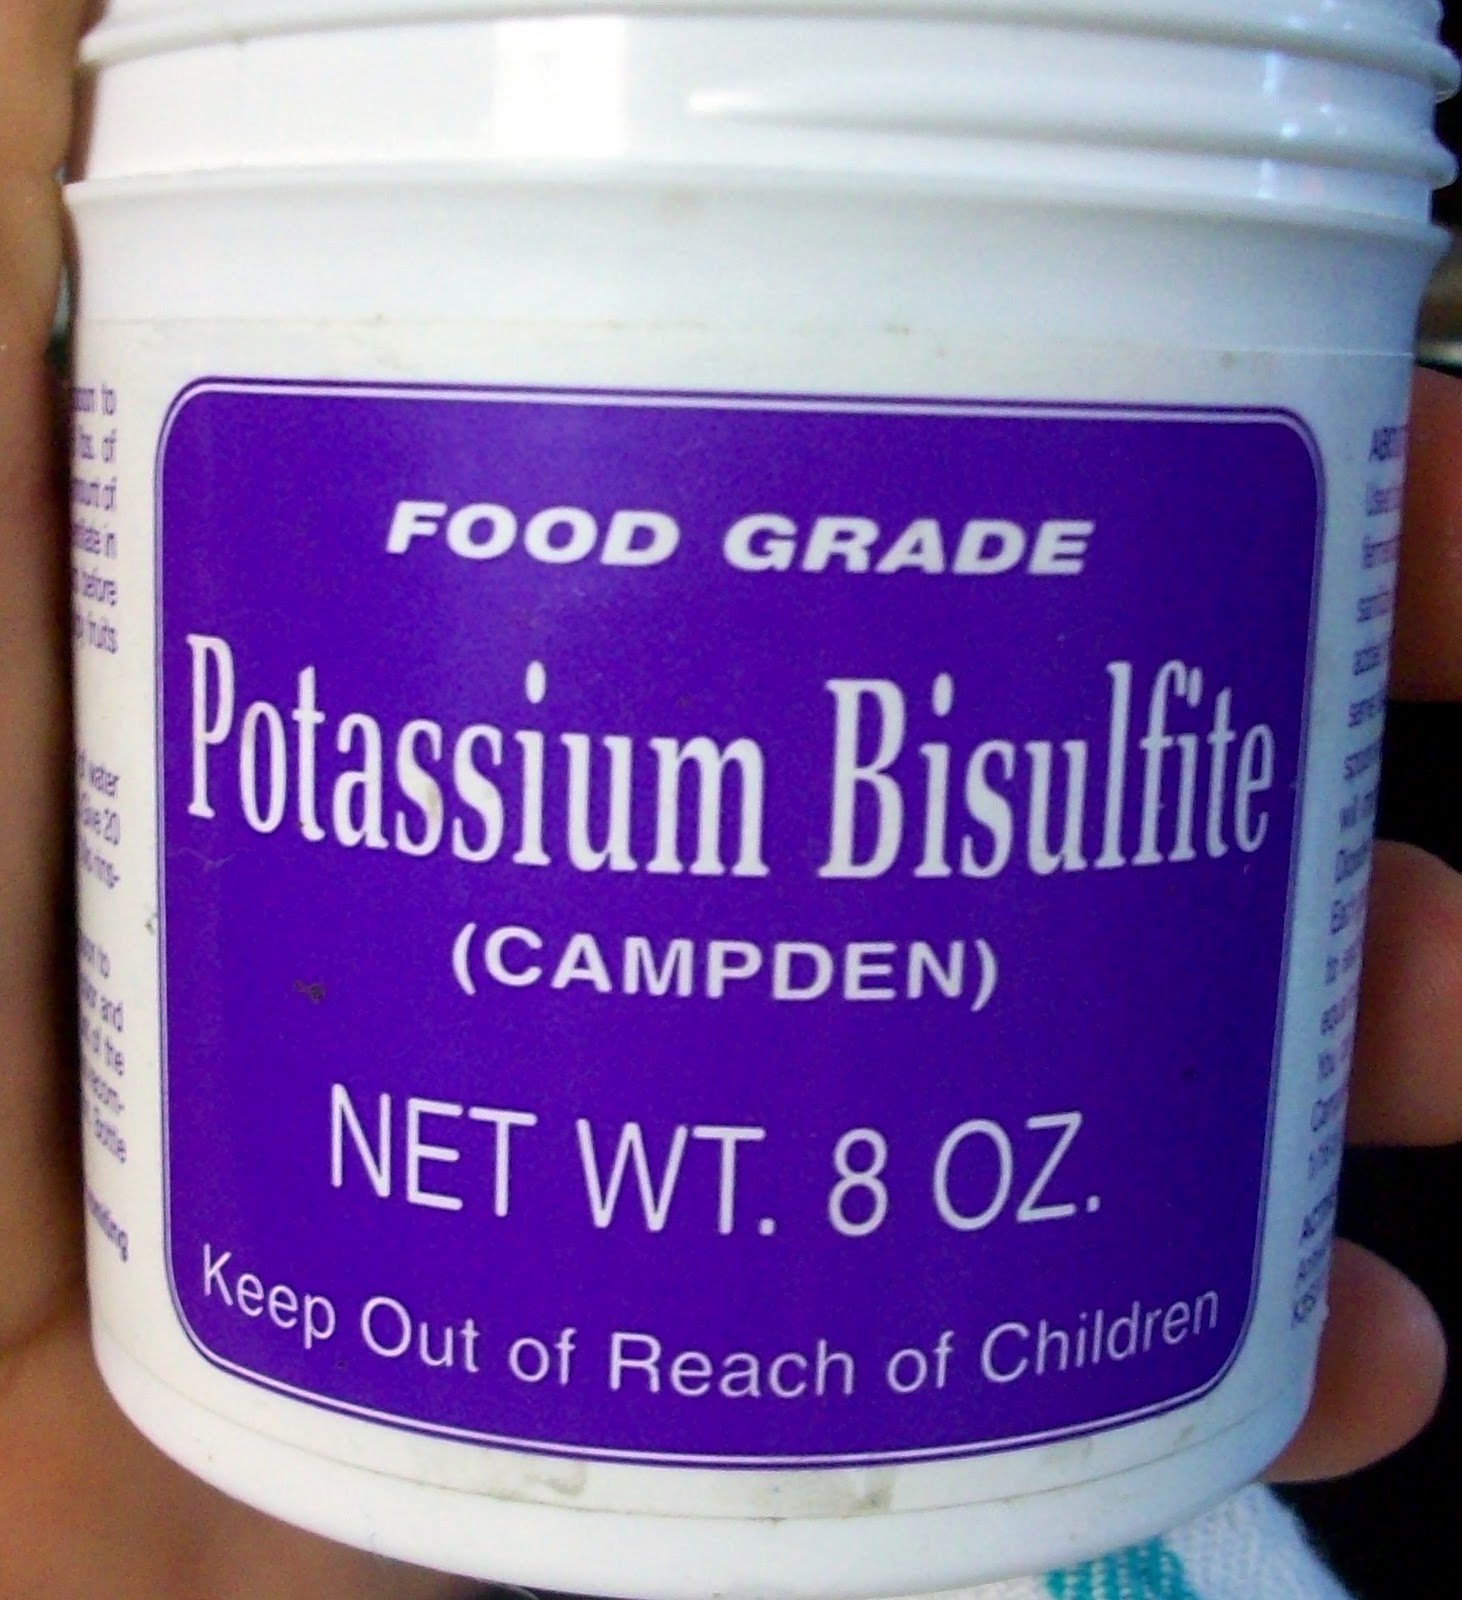 Add Potassium Bisulfite to break down the natural yeast in the grape skins so you don't end up fermenting your grapes before you are ready to...especially if you are making juice for the kids!! (follow directions given on the back of the container)
 The next day you will see a big difference in the amount of juice to pulp ratio!
  Crush down your grapes to get one last squish out of the pulp. (I used a sterilized wooden rolling pin...but if you have a fancy wine crushing rod that would work good too.)
 Grapes are ready to be filtered into juice! We started by scooping out as much pulp as we could and squeezing the juice out.
  Then we lined a 6 gallon bucket with organza fabric and poured the remaining pulp and juice into that so we could easily gather the top of the fabric and squeeze the remaining juice away from the pulp. We talked to someone who prefers to crush their grapes directly into a bucket prepared with fabric like this and then they never have to transfer buckets since all the fermenting and straining can take place in 1 bucket...smart idea!
 Pour and gather!
 JUICE!! We did this 3 more times with 3 more buckets and ended up with 15 gallons of juice... With that we made Wine, Canned Juice, and Jams.
Tuesday, August 24, 2010
Making Mead (honey wine) Step by Step with Photos
Mead or often referred to as "Honey Wine" is impressively easy to make!
 Step 1: Measure out 1 pound of honey for every gallon of water. We decided to only start with a 1 gallon batch, but as soon as we have the space we will get a 5 gallon batch going!
 Step 3: Add Champagne Yeast
Make sure to leave enough head space for the yeast and sugar to "work" and not have overflow. You can see in the photo that it is already foaming and if we would have topped it off too high, the pressure from the activity would have overflowed a bit.
Now we wait! The next step will be in about 3 months and the whole process for mead is about 9 months.
Monday, June 21, 2010
Wine Home Brew Step by Step with Pics - Pinot Noir Phase 2
We have waiting for the fermentation to stop and are ready to proceed forward with our Pinot Noir!
We got a chance to taste our wine at this point and I have to say it is definately sweeter than we expected...the wine isnt done so the flavor will still change, but not too much. The chart told us that 8 cups of sugar would give us a semi-dry wine...I personally wouldnt classify this in the "semi-dry" category. It taste a lot sweeter than we expected. We are still happy with it because it is nice to have some sweet wine around but if you dont like sweet wine, be sure to go with less than 8 cups of sugar!
We already completed Steps 1-10 and are ready to start steps 11-12.
(alot of my pictures for this phase didnt turn out very good so we have limited pictures for the steps)
Step 11: After Fermentation is complete (approx 2 months). Dissolve acid package in 1/2 cup warm water and add to clean pail.

 Step 12: Siphon wine out of carboy into pail containing acid solution. Take care not to transfer sediment off the bottom of carboy. (Our first batch of wine we did we did not follow this caution too well....it is really sad to work hard for several months on a batch of wine and then have a small layer of sediment at the bottom of every bottle :( SO we racked ours with a funnel and cloth that served as a filter just in case we picked up some sediment)
Step 13: Add potatssium sorbate to 1/2 cup warm water. Add to pail of wine.
 Step 14: Clean out Carboy, siphon wine from pail into clean carboy making sure not to aerate. Wine should take about 3 more weeks to clear on its own. If you want your wine sooner than natural clearing process use SuperKleer fining agent at this time. (We did not use super kleer on our last batch of wine and thought it would be fun to give it a try just to see what all the hype is about...it was actually really impressive!)
For 25-30% greater flavor and some sweetness, add one pint extra concentrate at this time. Dissolve into wine. If wine is to dry oyu could use sugar to sweeten at this time. (We did purchase the extra pint of concentrate but we actually considered not adding it because our wine was pretty sweet...but we figured we already had the concentrate so we might as well add it instead of waste it!)
 Step 15: When wine is totally clean (2-3 days with Super Kleer or 2-3 weeks without), siphon off any remaining sediment into clean pail.
Step 16: Degas wine by stirring vigorously.
 Step 17: Prepare bottles by cleaning with One Step. Soak corks in sulphited solution, 1/2 teaspoon per gallon of water for 2 hours.
Step 18: Fill bottles using bottle filler.


From this set we got 23 bottles of wine. We tasted it and it is pretty sweet...alot sweeter than what we thought. However, it still tastes fantastic! We used 8 lbs of sugar to get a semi-dry wine but as sweet as it is we decided to go with 6 lbs of sugar from now on to get a dryer wine. It really was a lot of fun being able to customize this wine!! Im excitted to wait a couple months and try it again...it gets better and better with age.
Since we had all the wine equipment out and sterilized we decided to start right in on the second set of wine we got from Home Winery Supply. The second set we got was the Sangiovese....more details to come :) Sangiovese is one of my favorite wines so I am really excited about this one!!

We got a chance to taste our wine at this point and I have to say it is definately sweeter than we expected...the wine isnt done so the flavor will still change, but not too much. The chart told us that 8 cups of sugar would give us a semi-dry wine...I personally wouldnt classify this in the "semi-dry" category. It taste a lot sweeter than we expected. We are still happy with it because it is nice to have some sweet wine around but if you dont like sweet wine, be sure to go with less than 8 cups of sugar!
We already completed Steps 1-10 and are ready to start steps 11-12.
(alot of my pictures for this phase didnt turn out very good so we have limited pictures for the steps)
Step 11: After Fermentation is complete (approx 2 months). Dissolve acid package in 1/2 cup warm water and add to clean pail.


Step 13: Add potatssium sorbate to 1/2 cup warm water. Add to pail of wine.

For 25-30% greater flavor and some sweetness, add one pint extra concentrate at this time. Dissolve into wine. If wine is to dry oyu could use sugar to sweeten at this time. (We did purchase the extra pint of concentrate but we actually considered not adding it because our wine was pretty sweet...but we figured we already had the concentrate so we might as well add it instead of waste it!)

Step 16: Degas wine by stirring vigorously.

Step 18: Fill bottles using bottle filler.

Step 19: Cork them using cork driver. (We also apply colored wine bottle sealers so we can tell our various wines apart. We wanted to make labels, but after cleaning the labels off of so many different bottles we opted out of dealing with labels!!)

Step 20: Allow bottles to age 2 months if possible before consuming.

From this set we got 23 bottles of wine. We tasted it and it is pretty sweet...alot sweeter than what we thought. However, it still tastes fantastic! We used 8 lbs of sugar to get a semi-dry wine but as sweet as it is we decided to go with 6 lbs of sugar from now on to get a dryer wine. It really was a lot of fun being able to customize this wine!! Im excitted to wait a couple months and try it again...it gets better and better with age.
Since we had all the wine equipment out and sterilized we decided to start right in on the second set of wine we got from Home Winery Supply. The second set we got was the Sangiovese....more details to come :) Sangiovese is one of my favorite wines so I am really excited about this one!!
Thursday, May 13, 2010
Wine Home Brew Step by Step with Pics - Pinot Noir Phase 1

 Home Winery Supply is where we got this set of wine kits (picture to the right). We are going to start with Pinot Noir (we also got Sangiovese), and follow the Concentrate Setup Sheet (similar to the one provided here).
 Make sure you have ALL your necessary supplies BEFORE you start!!
PHASE 1: (this entire phase only took about an hour)

Step 1: Thoroughly clean ALL equipment with "One Step Cleanser"(or similar product, follow instuctions on package). Dissolve 1 TBSP of One Step in 1 gallon of warm water, Wash bottles and equpment with the solition. Rinsing in not necessary with One Step. Seriously this is probably the MOST important step in home brewing. If you dont sanatize your equipment...ALL your equipment... then bacteria will grow and it will destroy your work. What a bummer to wait several months and then have nasty tasting wine...so CLEAN ALL YOUR STUFF!!

Step 3: Add 3 Gallons of warm water (DO NOT use chlorinated and or distilled water) to pail along with your sugar to dissolve sugar (6-10 lbs of sugar will be necessary dependant upon how sweet you want your wine...we are going with 8 lbs of sugar to get a semi-dry wine)..you may need to give it a good stir to help dissolve the sugar in the warm water.


Step 6: Stir


Step 9: Add yeast from step #2 making sure water is below 100 degrees

 Put your Carboy in a "safe place" where you can monitor it... for us that "safe place" is behind the sink in the kitchen. We have a corner sink and the cabinet is just tall enough for our Carboy to fix perfectly under! Then if we have any overflow from the yeast/sugar reaction...at least it is right by the sink to clean it up!
 WAIT! Fermentation will take about 4-8 weeks. Have fun watching the yeast and sugar react and "get movin" in the container!
Supplies for Home Brew Winemaking


WHAT YOU WILL NEED: Make sure you have all the necessary supplies BEFORE you start!! Check your local Brew store for the necessary supplies...shipping can really add up on some of the larger items!
 One Step Cleanser
- Wine Concentrate - Home Winery Supply provides the following ingredients as well (Yeast is $1.00 and is enough for one concentrate. Acid is $1.25 and is enough for one concentrate. Enzyme is $2.50 and is enough for 4 concentrates.)
 Wine Yeast
- Pectic Enzyme
- Acid Package
- Potassium Sorbate
- Super Kleer
(if desired)
- Sugar (6-10 lbs)
 6 Gallon Pail (One)
- 5-6 Gallon Carboy (One)
- Rubber Stopper
& Air Lock
- we have several extra Air Locks just in case 1 breaks, they are super cheap and can really make or break your wine!
- Thermometer
- Siphon Hose
 Racking Tube
- Large Spoon (long enough that it can reach into the bottom of the 5 gallon glass carboy and stir up all the wine)
- Bottle Filler
- Wine Bottles (ask friends and family to start collecting wine bottles, or check your local brew store for their old bottles...they usually sell them alot cheaper than the new ones!)
 Super Grunge Remover (or similar item) this will be necessary if you are using recycled bottles that you need to get the sticky icky labels off!
 - Corks and Corker ... this wont be necessary until the final step in a couple months


The easiest option would be to buy a winemaking/homebrew kit
Subscribe to:
Comments (Atom)