About Me

- Homestead Roots
- My tremendously supportive husband & I have 3 wonderful children, 1 dog, 12 laying hens, 2 dairy goats, 3 bee hives, and a 2000 sq foot vegetable garden on a small 1/4 acre lot in the city. In the center of it all is our small 1,000 sq foot house purchased in 2008 as a foreclosure that we fully renovated to host our growing family, home school adventures, and small home business (CozyLeaf.com). We have a desire to learn a path to self sufficiency finding ways to be good stewards of the resources God has given us. We want to learn to live with less as we laydown roots to our little homestead.
Saturday, October 6, 2012
Saturday, September 29, 2012
Thursday, September 27, 2012
Baby Chick Feeder DIY Super Easy Works Great!
We have more baby chicks here on our little farm and they sure do eat alot! Its quite frustrating to constantly be filling their food and then realize its all out again! I love these little feeders that hook to a mason jar but I do not like that you can only fill them with 1 quart of feed at a time. They take up minimal floor space on the cage but are quite a hassle if you have a lot of birds. I kept trying to think of a way to make them easier to fill (from the outside of the cage) as well as easier to keep full! I took our metal feed tray with me to Lowes and found all the lovely parts to make it work like it does in my mind!!
 Supplies: 1 feeder tray (I used the metal tray so I could bend out the inside rings so the PVC would slide right in $3.50), 1 4"x2" PVC Coupling (In the plumbing section of your hardware store - $5), 1 4" PCV Pipe (I got the 5' piece and cut it in half so I can make 2 of these feeders - $8), 1 tube of All Purpose Caulking ($2.99)
Total Cost: Under $20! I also have half of the PVC pipe left to make another feeder as well as plenty of caulking for other projects! Or you could make 2 of these (by purchasing an additional feeder tray($3.50 and an additional PVC Coupling $5) for $29.
Start by crimping, hammering, or pinching your ring so its completely flat (this looks like its got extra crimps, but they are pushed to the opposite side so as to flatten the inside)
Now its time for the caulking. Apply it generously so you get a good firm seal
Wipe clean any goopy extra that has smashed out.
Now cut your PVC pipe if you want. I wanted to cut mine so I could make 2 and I wanted them short so my kids can easily fill them. If they were 5 feet tall, they would hold alot more feed, but the kids wouldnt be able to do all the upkeep. So decide what your needs are and modify as needed!

 Hook up your feeder wherever is most convenient for you to monitor and fill it...also consider what will be easiest and most efficient for the chicks to gather around and eat from it! Dont put it in a corner or the backside of the feeder will be cut off.
 Zip tie the top and bottom in place so the birds dont move it around.
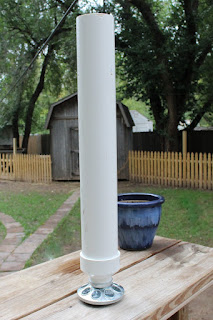
 Pour away!! Its perfect height for my kids to reach it and peek in to see how full it is. I used an old pot as the cap to keep out bugs. You can purchase a PVC cap, but im sure you have a tupperware or old pot you can use...save the money for feed!
All gathered around and eatin away! I have our feeder right in the middle of the chicks cage. I also have the whole cage up off the ground an inch or so to help keep them nice and clean. I use cheap plastic table clothes (2 for $1) to cover the floor, makes for SUPER easy clean up! I clean it as needed. I can also lift this cage quite easily and set them outside on the ground to get some good outdoors time. This makes for super easy cleanup, just by moving them! They will only be in this cage for a few weeks. In which we will increase their outdoors time till they are ready to scratch, run, play, and defend themselves outside.
Let me know if you use this idea!! I would love to hear how it works for you and what modifications you do to make it work best for your situation.
Thanks!
Saturday, September 8, 2012
Thursday, August 30, 2012
Backyard Areas, How we make it all fit
I have no idea how I have been blogging about our backyard adventures for several years and didnt have a single overall picture to share! So here it is! The summer heat took its toll on our attempt at grass growing, but we will reseed in the fall and hopefully get a full lush lawn by next year!
We have our yard divided into 4 sections. The garden area which is also where the bee houses reside, the chicken and compost area, the goat area and then the yard and play area.
You will have to click on the pictures and make them larger so you can see the labels.
In the far back corner of the yard we have the chicken coop and hen area. It is connected to the compost area so they can constantly be turning and working the compost pile. When we put all the hay from the goat area back there, those girls will work for days getting every last bug, weed, and seed out. They also get any and all food and garden scraps as well as a generous (thanks to Addie) supply of veggies, bugs, worms, and feed. This area is also right next to the garden so we open up and connect the two areas during the winter so the chickens can get out any and all weeds and bugs. Occasionally we do let the chickens and goat all out of their areas (under supervision) for a "walk about" through the yard and garden. The goats sure can tear out some weeds in the garden real quick and the chickens have at the bugs! But if they arent watched closely every single tomato will be gone quite quickly! In between the chicken and goat houses is the garage. The goat house is small and low to the ground (since they are little mini goats). The goats have quite a bit of space and in the middle of their run is the milking barn. This is where all the feed, hay, and any animal supplies are stored.
Here you can see the playset which is almost always in use! The path leads to the garden which is also where the beehives are located. We want them close to the garden for easy pollination but also it provides a protective fence so no kids stumble upon them and get too curious.
I would like to add that our animals do have more attention and interaction than most others. There is almost always someone in our backyard playing or working and we are playing, feeding or grooming them constantly. The animals are not continually restricted to confined areas. They are regularly patrolling the entire area finding snacks or playing. We have found it is safer for the animals and for our children and their friends if everyone has their own separate area to retreat to and feel safe when things get a little crazy. And when we have people over we have found it to be nice and necessary for the kids to be able to play and the goat & chickens to go off to a safe and comfortable are to eat or sleep undisturbed.
There you have it! That is how we make it all fit!!
Labels:
backyard chickens,
bee hives,
chicken,
chicken coop,
city farm,
city goat,
city goats,
dairy goats,
goat barn,
goats,
home management,
home school,
house,
nigerian dwarf,
school,
urban farming,
urban goat
Wednesday, July 18, 2012
1 dough recipe... MANY options
 I have 1 recipe that I use extensively more than any other recipe in my kitchen! Its my Pizza Dough recipe...well, its not "my" pizza dough recipe, its actually Emily's! I got this recipe from her about 5 years ago and I was standing in her kitchen as she told me the recipe and I scribbled it down on a little note pad...I still have that same scribble paper taped to the back of my cabinet above my oven and I refer to it quite often...even though at this point I pretty much have it memorized.
But let me tell you that this recipe is good for SO much more than just your standard pizza!
 Double Decker Pizza!! A big favorite around here...1 rectangle pizza can serve a large crowd! We also love to have "make your own pizza" night! Very fun...its also fun to see what the kids create!
 Pigs in a Blanket! I usually cut the hotdogs in quarters and then wrap em up. This way you get a whole lot more from 1 hot dog ;) I mean really...isnt that just asking to be dipped in a smiley face of ketchup and mustard!
Pizza Rolls! You can seriously put just about anything into the center of a pizza roll and my kids will LOVE it!
Not to be mistaken with...
 Calzones! Also a GREAT leftovers type meal...as long as you have cheese and some type of sauce...just toss in the remaining meat and veggies from previous nights meals!
Hot Pockets (this is a big lunch time favorite here!! Let everyone customize and fill their own for added fun!)
Dinner Pie (these are great when you just need to use up some stuff in the refrigerator...you can pretty much fill it with anything, just add some chicken stock to help it not get dry!)
Subscribe to:
Posts (Atom)


