 Why oh Why do we buy these kids toys?? George has so many toys that have been handed down from his two older siblings as well as the many toys that people have purchased for him BUT his favorite toys are the ones that were free. He loves to sit in the kitchen with me and play with tupperware and lids. I hardly ever use these anymore, but still have a whole drawer in the kitchen reserved for "toys".
 About Me

- Homestead Roots
- My tremendously supportive husband & I have 3 wonderful children, 1 dog, 12 laying hens, 2 dairy goats, 3 bee hives, and a 2000 sq foot vegetable garden on a small 1/4 acre lot in the city. In the center of it all is our small 1,000 sq foot house purchased in 2008 as a foreclosure that we fully renovated to host our growing family, home school adventures, and small home business (CozyLeaf.com). We have a desire to learn a path to self sufficiency finding ways to be good stewards of the resources God has given us. We want to learn to live with less as we laydown roots to our little homestead.
Monday, February 27, 2012
Kitchen Buddy and his "toys"
Why oh Why do we buy these kids toys?? George has so many toys that have been handed down from his two older siblings as well as the many toys that people have purchased for him BUT his favorite toys are the ones that were free. He loves to sit in the kitchen with me and play with tupperware and lids. I hardly ever use these anymore, but still have a whole drawer in the kitchen reserved for "toys". Sunday, February 26, 2012
Beauty & her Beast

Sarge is the perfect "farm dog"...fierce and gentle!
He is so vicious and loud when something is going on around "his property" that he doesn't like. There have been many occasion when he jumps into action to let it be known that he is on guard and his ferocious bark makes my heart jump right out of my chest! Then there are these precious moments when he and Addie snuggle and he is the most gentle creature in the world! These two have always had a special bond ever since he was a tiny puppy. He will do whatever Addie tells him to do...when she is scolding him for something he did wrong she sternly says "Sarge, go to your box", he just shrinks down and runs straight to his box. I think its part of the reason he takes such good care of the chickens, because they are Addie's chickens and she loves them so much. There have been many occasions when Addie is out feeding "the girls" and Sarge is running around being hyper and Addie yells "Sarge, calm down and leave my girls alone!"...to which he quickly obeys!
 These two are just so precious! They have had a special bond since the day we brought him home as a puppy. I cant imagine a better dog for our family!
Saturday, February 25, 2012
Homemade Powdered Laundry Detergent Recipe DIY with Pictures
 After digging up advice from my dear friends Erin and Annie (who are both my "soap experts") and arming myself with these 4 ingredients I am ready to take on homemade laundry detergent!! I've been experimenting with a few recipes the past few weeks to find out what works best for me and my family!! I'm so excited about this!! I cant believe I haven't tried this before, its ridiculously easy!!! I prefer the powder detergent...just cause every time I have liquid detergent I end up with a big spill and it is quite frustrating to clean up! At least with powder you can just bust out the vacuum and not have to worry about a ton of sticky suds to mop up.
  However, I was very frustrated with the idea of grating the soap and having chunks of soap for my machine to have to dissolve. I want to be able to use cold cycles and not wind up with chunks of soap melted to my clothes in the dryer. This is by far my favorite of the recipes...which is actually the combination of several recipes because it just works well for me and my family!
- 2 cup Borax
- 2 cup Washing Soda
- 1/2 cup Baking Soda
- 1 Bar Fels Naptha
This size batch last me at least a month to a month and a half...and let me tell ya, I do alot of laundry around here! Its so ridiculously easy and FUN and my laundry is so fresh and clean! I use 1-2 tablespoons per load. I have a front load Whirlpool duet washing machine and this recipe works great with my machine!
I also found a few tips and tricks for getting the soap bar super fine...and this is SO FUN!! I use it as our science experiment for school that day and the kids loved it!
 1 bar of Fels-Naptha on a large plate...put it in the microwave for 90 seconds. The small air pockets in the bar of soap will expand in the microwave causing it to puff up like a sponge! After 60 seconds it has started to expand. After 90 seconds its all puffy and crumbly! Just let it rest & cool in the microwave...otherwise the smell will be quite strong at this point! Since the Soap bar has been puffed up and all crumbly you don't need to worry about it turning into a brick at the bottom of your blender...which happened to me once and is quite frustrating to clean out. Then you just need to break it apart into the blender with your Borax and Washing Soda and you have a super fine Laundry Powder!!
When your clothes are clean and smell fresh, it actually makes doing laundry fun...especially when you have this little laundry buddy...

Friday, February 24, 2012

Thursday, February 23, 2012
Homemade Caramel Corn Recipe without corn syrup
 We sure love popcorn! Its an inexpensive and easy snack. I prefer to buy popcorn kernels in bulk and a big package of brown paper sacks and make my own microwaveable popcorn. Its so easy! I also love caramel corn...but its quite disturbing to see all the corn syrup and preservatives that are in store bought caramel corn and even a lot of homemade caramel corn recipes. So, I figured there had to be a way to make it without corn syrup! I searched around and combined a few recipes and ended up very delighted with the outcome! Caramel Corn without corn syrup! It is so delicious! I drizzled a little melted chocolate over the top and it added that extra touch of "love".
Caramel Corn: Makes 1 Yummy Gallon!!
1 gallon of popped popcorn (no need for added butter or oil, just pop the kernels "dry"1 cup peanuts (optional)
1 cups brown sugar
1/2 cup butter
1/2 cup water
1 teaspoon salt
1 teaspoon vanilla
1/2 teaspoon baking soda
Step 1: Preheat oven to 250 degrees.
Step 2: Pop a gallon of popcorn
Step 3: Put your popped popcorn and optional 1 cup of peanuts in a large bowl
Step 4: In a saucepan combine brown sugar, butter, water and salt and bring it to a boil. Boil for about 5 minutes until it reaches "soft ball stage" (basically just till it starts to thicken and coats the back of a spoon).
Step 5: Remove from heat and stir in the vanilla and baking soda (Do this quick cause it will bubble and puff up).
Step 6: Pour it over your popped popcorn and peanuts and toss it till all the popcorn is coated with the yummy sugar!
Step 7: Line 1 cookie sheet with parchment paper and spread your caramel corn out onto the sheet.
Step 8: Bake for 45 minutes stirring several times during baking.
Step 9: (While your caramel corn is baking) In a double boiler, melt some chocolate (optional)
Step 10: Pull out your caramel corn and drizzle the melted chocolate generously over your caramel corn.
Step 11: Let it cool and then watch out cause it will go quickly!!

 This would be a great gift idea to package up for any holiday or birthday! It would also work great as little party favors or just a big batch for family movie night! It filled a gallon jar with delicious caramel corn without all the added corn syrup and preservatives. I will definitely make a double batch next time because it was a huge hit and didn't last long!
Wednesday, February 22, 2012
Zoo days
I sure love going to the zoo...maybe more than the kids do!
 Addie had a little lamb its fleece was white as...well, this one isn't white, but she really loves sheep and desperately wants a precious little lamb.
My handsome little man

 So, the masive tiger was sitting right beside the window and Addie walks over and starts knocking on the window trying to introduce him to her "tiger baby" (which is actually a yellow lion stuffed animal).
  Unfortunately for Addie, the tiger was not interested in meeting tiger baby.
If only I had HALF his energy!!!


Leave it to the boys to decide we need a "route" as we take on the zoo!

Absolute JOY!


"Ok mom, I just cant smile for that camera anymore."

Tuesday, February 21, 2012
Light and Fluffy Pie Plate Rolls Recipe with fresh ground wheat
I have gone through so many different bread recipes to try and find the best fit for me...let me tell ya, its quite frustrating to spend hours investing in a recipe that you just cant EVER get right! I have 2 main dough recipes that I have taped to the back of my cabinet door above my stove that are my "go to" dough recipes. One recipe is a quick and easy, very basic recipe and it is what I use for pizzas and stuffed doughs. Then there is the breads and rolls recipe...and here it is! I have broken down the recipe to make rolls to fill 1 pie plate...this is just about how many I would need for my family for dinner, and a few extra for lunch the next day.
Pie Plate Rolls:
- 1/4 cup warm water & 1/4 cup warm milk (or just 1/2 cup of warm water)
- 1 teaspoon yeast
- 3 Tablespoons sugar (or honey)
- 1 egg
- 3 Tablespoons butter (melted)
- 1/2 teaspoon salt
- 2 cups whole wheat flour (freshly ground wheat will make for the most overwhelmingly delicious rolls!)
- sometimes I also toss in herbs or ground flax but not all the time.

(these pictures are for 20 large rolls and I did 4 times the recipe and used a large pan 9x13 pan...cause my dad was coming over, hahaha, and a lot of other people)...and about 2 and a half hours from start to finish.

 First you want to combine the warm water, sugar, and yeast and let it activate by letting it set for a few minutes.
 Attach your paddle to your mixer (not the dough hook...we will use that later). The paddle will help mix up the gluten much faster! Add in 3/4 of your total flour (for 1 batch you will add 1 1/2 cups of flour for 4 batches together you will add 6 cups) and save the rest for the next step. Set your mixer on speed 4 and mix for 5 minutes.
 You can see how clumpy the mixture is as you start to mix it up...then as the gluten activates it is more stretchy!
 Now attach your dough hook and add the remaining flour. Kneed with the dough hook on speed 2 for about 5 minutes.
You will see how the dough forms a slightly sticky ball and this is perfect!!

When you are working with fresh ground wheat it will react differently than bleached white flour you buy in the store. You want to keep it as moist as possible and avoid adding any extra flour! When I first started grinding my wheat at home and trying to bake with it I would get extremely frustrated because all my bread would turn out as heavy bricks! I have now found out it is due to adding too much flour! To prevent sticking, you want to add a small bit of warm water or oil to your hands instead of flour.

 Now you have a beautiful ball of moist and sticky dough. Cover the dough with a damp towel and place it in your oven along with a few cups of steaming water. The steaming water helps maintain moisture as well as a warm temperature. This is another trick I have learned along my journey to fluffy light bread!
Let your dough raise for about 45 minutes.
Once your dough has doubled in size you want to punch it down and begin forming your rolls!
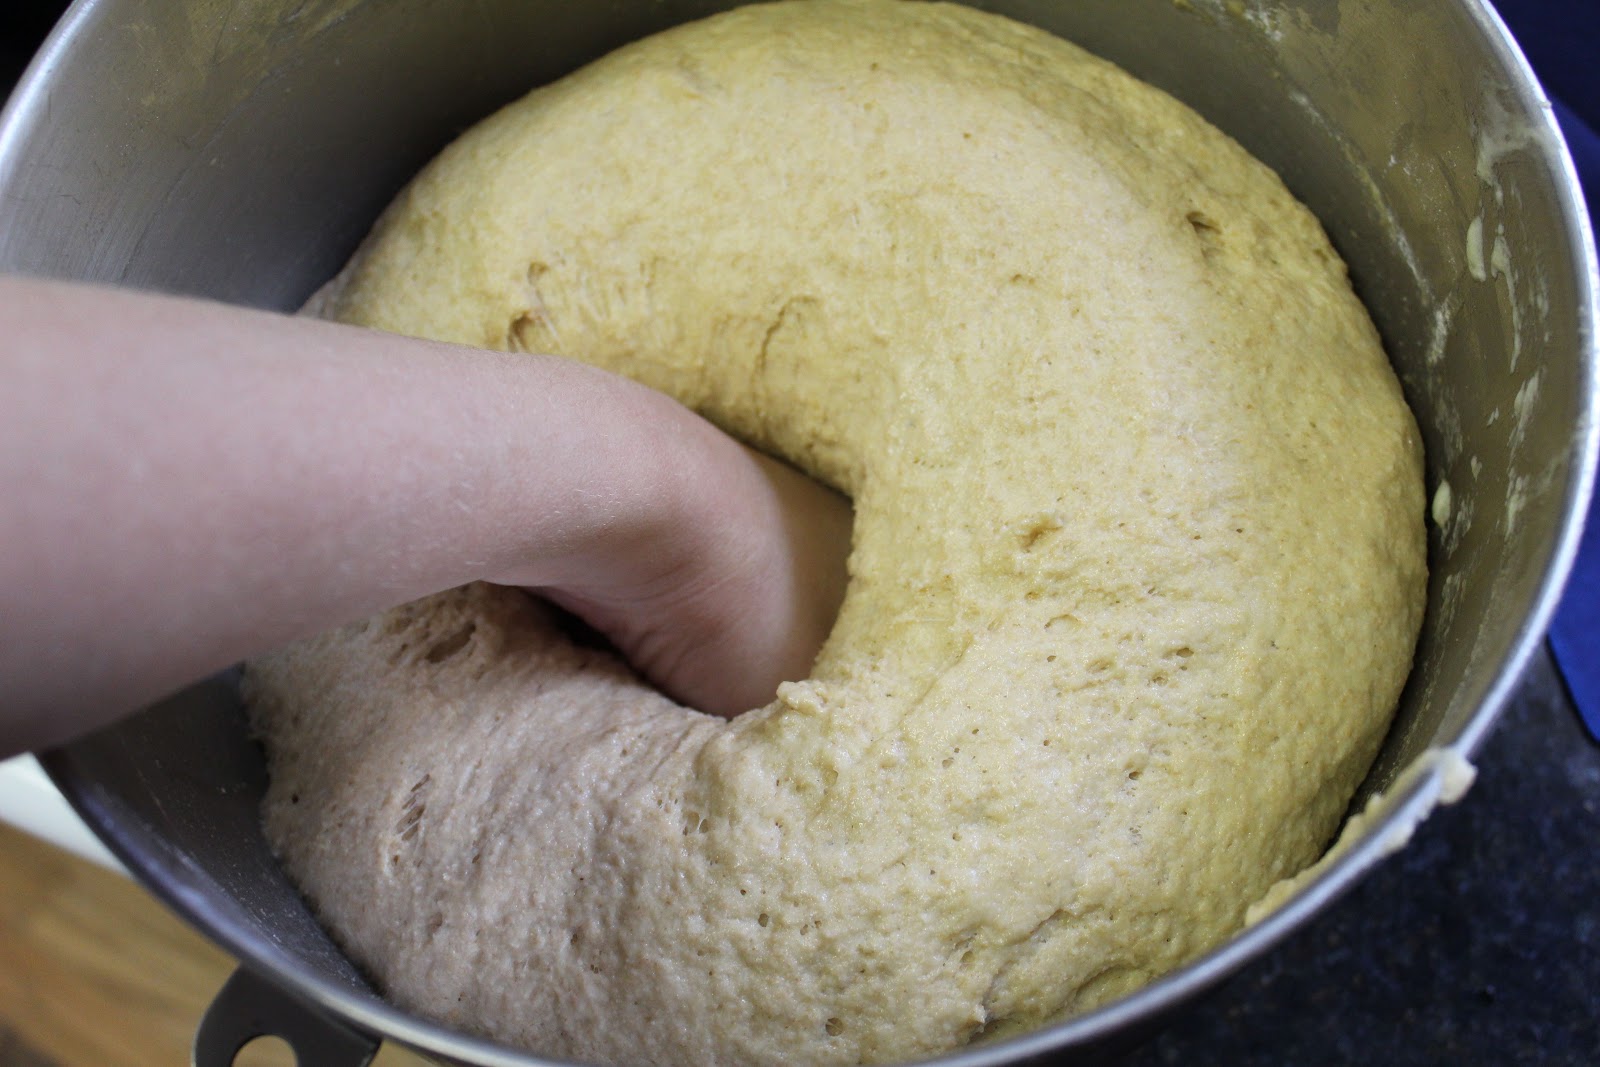
Now to the fun part! Well, actually everything about making homemade rolls is FUN, but this is where all the kids at heart get excited because you get to dig in and get your hands messy!! :)
This is how my mama taught me to make rolls...dont pull out a clump of dough and roll it into a ball.
You want to take some of the dough and pinch off your roll to keep the top nice and perfect as well as not deflating your dough!
Big Ball of dough ...

Get ready...

Slide your index finger and thumb around in the size you want...

Squeeze the roll out...

Pinch it off...

Toss it into the pan!

Once all your rolls are even and placed into the pan (which you may need to add to or take away from a few and reshape them...unless you are an amazing guesstimator and can make 20 perfectly sized rolls the first time!) Top your pan with a damp towel and place back into your warmed oven with the hot steamy water.

Let your rolls raise for about 45 minutes...until they are doubled in size.


 Preheat your oven and bake at 350 degrees for 15-20 minutes or until the tops of your rolls are golden brown and sound hollow... Reach in the oven carefully and tap the top of your rolls with your finger nail and it should sound hollow. Take them out of the oven and let the river of butter flow!!
  I made a big pot of chili that night to go with the rolls! Chili that is cooked on low all day is SO delicious...plus its is something I can make first thing in the morning and put it in a pot on the wood stove (or in a crock pot) while I get the house all clean. Then Im not making a mess of my kitchen right before company is coming over.
 Thursday, February 16, 2012
Hibiscus Twist Loose Leaf Tea by Cozy Leaf (me!)
Pin It

New Blend HIBISCUS TWIST!!! This is one of those blends that I have worked on for a long time to get it just right!! Delicious, Heart healthy, and weight loss encouraging...what more can you ask for!?! Are you looking for an all around amazing tea, then this is the blend for you and your family! Simply delicious hot or cold!
Hibiscus flowers are not only extremely delicious when brewed, but they are also extremely healthy for you!! Healthy and Delicious, yes please :) Regular consumption of hibiscus teas often lowers blood pressure as well as lowering cholesterol therefore reducing the risk of heart disease. Hibiscus is also the source of the hydroxycitric acid (HCA, or hydroxycut) used in many diet formulas. This compound has been long used to fight obesity. Scientific studies find that it stops the conversion of carbs in food to body fat. It fights appetite and encourages weight loss not by increasing energy expenditure but by encouraging the "wasting" of carbohydrates. HCA does not enhance weight loss during low-carb or Atkins-style diets, but it does help weight loss when used with a program of general calorie restriction reducing consumption of carbs, protein, and fats equally. This blend also packs a great amount of Vitamin C and has a very distinct vibrant red color when brewed!
Subscribe to:
Comments (Atom)